
How to Freeze Corn on The Cob tastes sweet, crisp, and sunny even in the middle of winter, and it works perfectly for busy home cooks who want summer flavor in under an hour of hands-on time. You blanch, cool, and freeze the corn, then pull it out months later for soups, salads, and quick sides. I grew up in the Midwest with corn stands on every corner, so I learned early that frozen sweet corn can save a weeknight dinner.
Why Make This How to Freeze Corn on The Cob at Home
You control the freshness, the salt level, and the texture when you freeze corn on the cob at home. Grocery store frozen corn often sits for months before it hits your cart, while your version can go from farm stand to freezer in a single afternoon.
You also save money when you buy corn in peak season and stash it away. I like to freeze several batches in August, then use them in chowders, tacos, and casseroles when fresh corn costs more than my coffee habit.
This method kept my corn bright, sweet, and crisp all winter long, and it tasted like it came straight off the summer grill. ★★★★★
Ingredients You Need
Fresh corn on the cob
- Fresh sweet corn on the cob, husks on if possible
- Choose ears that feel heavy for their size.
- Look for bright green husks and moist, golden silk.
- Avoid ears with dry, brown silk or soft, dented kernels.
Optional seasoning for serving later
You do not need seasoning to freeze the corn safely, but I like to note some favorites for when I reheat it.
- Butter or olive oil
- Salt and black pepper
- Garlic powder or onion powder
- Fresh herbs like parsley, cilantro, or chives
- Lime juice or lemon juice
Pantry shortcuts and notes
- You can use store-bought pre-shucked corn if you feel short on time.
- Frozen corn from the store does not work for this method, since it already went through a freeze cycle.
- If you want to freeze just kernels, you can cut them off the cob after blanching and cooling.
Equipment list
- Large stockpot for blanching
- Tongs
- Large bowl for ice bath
- Colander
- Clean kitchen towels or paper towels
- Sharp chef’s knife (if cutting kernels off the cob)
- Cutting board
- Baking sheet
- Parchment paper (optional, but helps with sticking)
- Freezer-safe bags or containers
- I like heavy-duty zip-top freezer bags.
- A vacuum sealer works great if you have one.
- Permanent marker for labeling
Tips & Mistakes
- Cool the corn completely before freezing so you avoid ice crystals and soggy texture.
- Blanch the corn long enough to set the color, but not so long that the kernels turn mushy.
- Dry the cobs very well before freezing so they do not stick together in a frosty clump.
- Label every bag with date and quantity so you do not guess later.
- Avoid freezing corn that tastes starchy or tough, since freezing will not fix poor flavor.
- Keep the husks on until just before blanching so the corn stays juicy and sweet.
- Do not crowd the pot while blanching, or the water temperature will drop and cook the corn unevenly.
- Use a timer, not your memory, so each batch blanches for the same amount of time.
- Lay the cobs in a single layer on a baking sheet to pre-freeze so they do not freeze into a solid brick.
- Squeeze excess air out of bags to reduce freezer burn and keep the corn tasting fresh.
How to Make How to Freeze Corn on The Cob
Step 1: Prep the corn
Pull back the husks and remove them along with the silk.
Snap off the stem ends so the cobs fit in your pot and freezer bags.
Rinse the cobs under cool water to remove any remaining silk or debris.
Step 2: Boil the water
Fill a large stockpot about three quarters full with water.
Set it over high heat and bring it to a strong boil.
Salt the water lightly if you want, since it can boost flavor a bit.
Step 3: Blanch the corn
Lower 3 to 5 ears of corn into the boiling water with tongs.
Set a timer right away.
Blanch small ears for 4 minutes, medium ears for 5 minutes, and large ears for 6 minutes.
Step 4: Shock in an ice bath
Fill a large bowl with cold water and plenty of ice.
Lift the blanched corn from the pot and place it straight into the ice bath.
Cool the corn completely, about the same time as the blanching time.
Step 5: Drain and dry
Transfer the cooled corn to a colander and drain off the water.
Pat each cob dry with a clean kitchen towel or paper towels.
Dry the corn thoroughly so the surface feels barely damp.
Step 6: Choose cob or kernels
If you want whole corn on the cob, keep the ears intact.
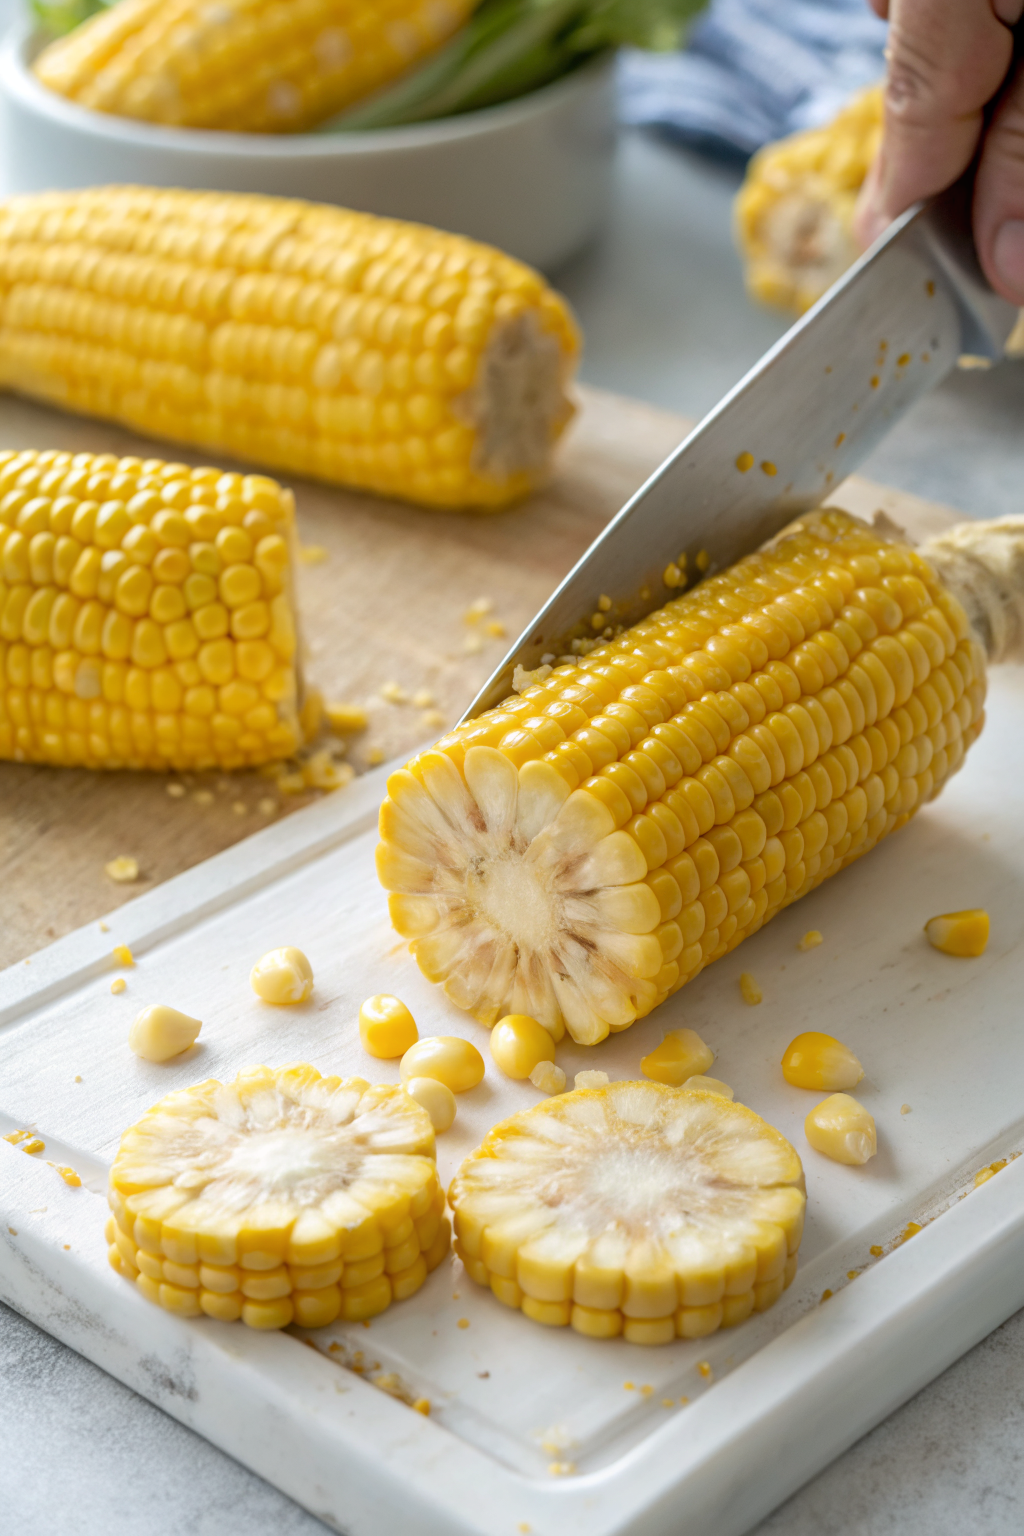
If you want kernels, stand each cob on a cutting board and run a sharp knife down the sides to cut off the kernels.
Work slowly so you cut close to the cob without slicing into it.
Step 7: Pre-freeze on a tray
Line a baking sheet with parchment paper.
Arrange the cobs or kernels in a single layer so they do not touch much.
Place the tray in the freezer and chill until the corn feels firm, about 1 to 2 hours.
Step 8: Pack and label
Transfer the frozen cobs or kernels to freezer-safe bags or containers.
Squeeze out as much air as you can, then seal the bags.
Label each bag with the date, number of cobs or approximate cup measure of kernels, and any notes.
Step 9: Freeze long term
Place the packed bags flat in the coldest part of your freezer.
Stack them once they freeze solid so they save space.
Use the corn within 8 to 12 months for the best flavor and texture.
Variations I've Tried
I sometimes freeze a mix of whole cobs and loose kernels, since cobs work great for grilling and kernels work better for soups and salads.
I also cut some kernels off the cob and freeze them in one-cup portions, which match most recipes in my kitchen.
On busy weeks, I blanch and freeze only half the corn and cook the rest right away for dinner, which turns one prep session into two meals.
You can also freeze grilled corn on the cob.
Grill the corn to your liking, cool it completely, cut off the kernels, then freeze them on a tray before packing.
The smoky flavor works nicely in tacos, salsas, and chowders.
How to Serve How to Freeze Corn on The Cob
You can steam frozen corn on the cob for a few minutes, then brush it with butter, sprinkle salt and pepper, and serve it with grilled chicken or fish. Cut frozen kernels into a skillet with a bit of olive oil, garlic, and herbs for a quick side dish. Stir thawed kernels into chili, vegetable soup, or corn chowder for extra sweetness and texture. I also toss thawed kernels into salads, salsas, and tacos when I want a pop of color and crunch.
How to store
- Fridge, fresh corn before freezing: Store unshucked corn in the fridge for up to 2 days. Keep it in the husk in a loose bag so it does not dry out.
- Freezer, blanched corn on the cob: Store in freezer bags for 8 to 12 months. Use it sooner for the brightest flavor.
- Freezer, blanched kernels: Store in flat, labeled bags for 8 to 12 months. Press the bags flat so they stack easily and thaw quickly.
- Best reheating method, whole cobs: Place frozen cobs in a pot with a bit of simmering water, cover, and heat 5 to 7 minutes until hot. You can also wrap each cob in a damp paper towel and microwave in short bursts.
- Best reheating method, kernels: Add frozen kernels straight to hot soups, stews, or skillets. If you want to serve them on their own, steam or microwave them with a splash of water, then season to taste.
How to Freeze Corn on The Cob
Ingredients
Method
- Prep the corn: Pull back and remove the husks and silk from each ear of corn. Snap off the stem ends so the cobs fit in your pot and freezer bags. Rinse the cobs under cool water to remove any remaining silk or debris.
- Boil the water: Fill a large stockpot about three quarters full with water. Set it over high heat and bring it to a strong boil. Lightly salt the water if you like to boost the flavor.
- Blanch the corn: Using tongs, lower 3 to 5 ears of corn into the boiling water. Start a timer immediately. Blanch small ears for 4 minutes, medium ears for 5 minutes, and large ears for 6 minutes so the color sets without turning the kernels mushy.
- Shock in an ice bath: While the corn blanches, fill a large bowl with cold water and plenty of ice. When the timer goes off, lift the ears from the pot and place them straight into the ice bath. Cool completely, for about the same amount of time as the blanching.
- Drain and dry: Transfer the cooled ears to a colander and let the water drain off. Pat each cob very dry with clean kitchen towels or paper towels until the surface feels barely damp so they will not stick together or form excess ice.
- Choose cob or kernels: For whole corn on the cob, keep the ears intact. For kernels, stand each cob on a cutting board and use a sharp chef’s knife to slice down the sides, cutting close to the cob without cutting into it. Work slowly to remove the kernels in neat strips.
- Pre-freeze on a tray: Line a baking sheet with parchment paper. Arrange the cobs or loose kernels in a single layer so they do not touch much. Place the tray in the freezer and chill until the corn feels firm, 1 to 2 hours.
- Pack and label: Transfer the frozen cobs or kernels to freezer-safe bags or containers. Squeeze out as much air as possible before sealing to reduce freezer burn. Label each bag with the date, number of cobs or approximate cup measure of kernels, and any helpful notes.
- Freeze for long-term storage: Lay the sealed bags flat in the coldest part of your freezer and let them freeze solid before stacking. Use the frozen corn within 8 to 12 months for the best flavor and texture.
Notes
Approximate per ear of blanched corn (about 90 g): 80–90 calories; fat 1.5 g; saturated fat 0.2 g; carbohydrates 19 g; fiber 2 g; sugars 6 g; protein 3 g; sodium 5 mg (not including optional salted water or seasonings added when serving). Values will vary based on corn variety, size of ears, and any fats or toppings used when reheating and serving.