Pumpkin Shaped Mini Apple Pies Recipe tastes like a cozy fall afternoon in dessert form, with buttery flaky crust and a gooey cinnamon-apple center in every bite. It works perfectly for busy home bakers who want a cute, kid-friendly treat on the table in about 1 hour from start to finish. I tested this recipe on my own family of picky eaters, and they inhaled them before I could take proper photos.
Why Choose This Pumpkin Shaped Mini Apple Pies Recipe
These mini pies look like tiny pumpkins, but they taste like classic apple pie with a hint of warm spice. Kids love the shape, adults love the flavor, and you get built-in portion control that still feels indulgent.
You can use store-bought pie crust to save time, or make your favorite homemade crust if you feel ambitious. The recipe scales easily, travels well, and works for parties, bake sales, or a cozy night in with a movie.
“These pumpkin shaped mini apple pies disappeared from the dessert table in minutes and everyone begged for the recipe! ★★★★★”
Ingredients You’ll Need
Pie Crust
You can use your favorite homemade double pie crust or a shortcut from the store.
- 2 refrigerated pie crusts (I like Pillsbury or Trader Joe’s, any standard 9-inch size works)
- Extra all-purpose flour for dusting the counter
- 1 large egg, beaten with 1 tablespoon milk or cream (for egg wash)
If you prefer homemade crust, use enough dough for 2 standard pie crusts and chill it well before rolling.
Apple Filling
Choose firm apples that hold their shape and do not turn mushy.
- 2 medium apples, peeled, cored, and finely diced
- Good options: Honeycrisp, Granny Smith, Pink Lady, or a mix
- 2 tablespoons granulated sugar
- 2 tablespoons light brown sugar, packed
- 1 tablespoon all-purpose flour
- 1 teaspoon ground cinnamon
- 1/8 teaspoon ground nutmeg
- 1/8 teaspoon ground allspice (optional but tasty)
- 1 teaspoon lemon juice (bottled works fine)
- 1 teaspoon vanilla extract
Pumpkin “Ridges” & Topping
- 2 tablespoons coarse sugar or turbinado sugar (for sparkle and crunch)
- Extra ground cinnamon for sprinkling (optional)
Equipment
- Pumpkin-shaped cookie cutter, about 3 to 3.5 inches wide
- Rolling pin
- Baking sheet
- Parchment paper or silicone baking mat
- Small mixing bowl
- Pastry brush or clean food-safe brush
- Fork and small sharp knife
- Cooling rack
If you do not own a pumpkin cutter, use a round cutter or glass and pinch little “stem” shapes at the top with your fingers.
Tips & Tricks
- Chill the dough well so the pumpkin shapes hold clean edges and bake up flaky.
- Dice the apples small so they soften fully inside the mini pies and do not poke through the crust.
- Taste the filling before you assemble and adjust sugar or cinnamon to match your apples.
- Use cold pie crust and cool filling so the fat in the dough stays solid until it hits the oven.
- Seal the edges firmly with a fork to keep the filling inside and avoid leaks.
- Cut small steam vents in the top crust so the pies bake evenly and do not burst.
- Rotate the baking sheet halfway through baking for even browning.
- Line the pan with parchment to catch any drips and make cleanup easy.
How to Make Pumpkin Shaped Mini Apple Pies Recipe
Step 1: Prep the Apples
Peel, core, and finely dice the apples into small cubes, about pea to corn kernel size. Place them in a small bowl. Add granulated sugar, brown sugar, flour, cinnamon, nutmeg, allspice, lemon juice, and vanilla.
Stir until the apples look evenly coated and no dry flour pockets remain. Set the bowl aside while you prep the crust so the flavors mingle.
Step 2: Prep the Baking Sheet and Egg Wash
Line a baking sheet with parchment paper or a silicone mat. In a small bowl, whisk the egg and milk or cream until smooth. Keep the egg wash near your work area with a pastry brush.
Preheat your oven to 375°F so it reaches temperature by the time you assemble the pies.
Step 3: Roll and Cut the Pumpkin Shapes
Lightly flour your work surface and rolling pin. Unroll one pie crust or roll your homemade dough into a circle about 1/8 inch thick. Use the pumpkin-shaped cutter to cut as many pumpkins as you can.
Gather the scraps, press them together, and roll again to cut more shapes. Repeat with the second crust so you end up with an even number of pumpkin cutouts.
Step 4: Set Up Bottoms and Tops
Place half of the pumpkin cutouts on the prepared baking sheet. These pieces will hold the filling. Keep the remaining pumpkin shapes on the counter as the tops.
If the dough softens too much, slide the baking sheet into the fridge for 5 to 10 minutes to firm it up.
Step 5: Add the Apple Filling
Spoon a small mound of apple filling into the center of each pumpkin on the baking sheet. Leave a border of about 1/4 inch around the edges so you can seal them. Do not overfill or the pies may burst open.
If you have extra filling, save it and spoon it over yogurt or oatmeal later.
Step 6: Brush Edges and Add Tops
Lightly brush the edges of each bottom pumpkin with egg wash. Place a pumpkin top over each filled bottom and line up the edges. Press gently around the filling to push out extra air.
Use a fork to crimp all around the edges and seal each mini pie. This step gives a cute rustic look and keeps the filling inside.
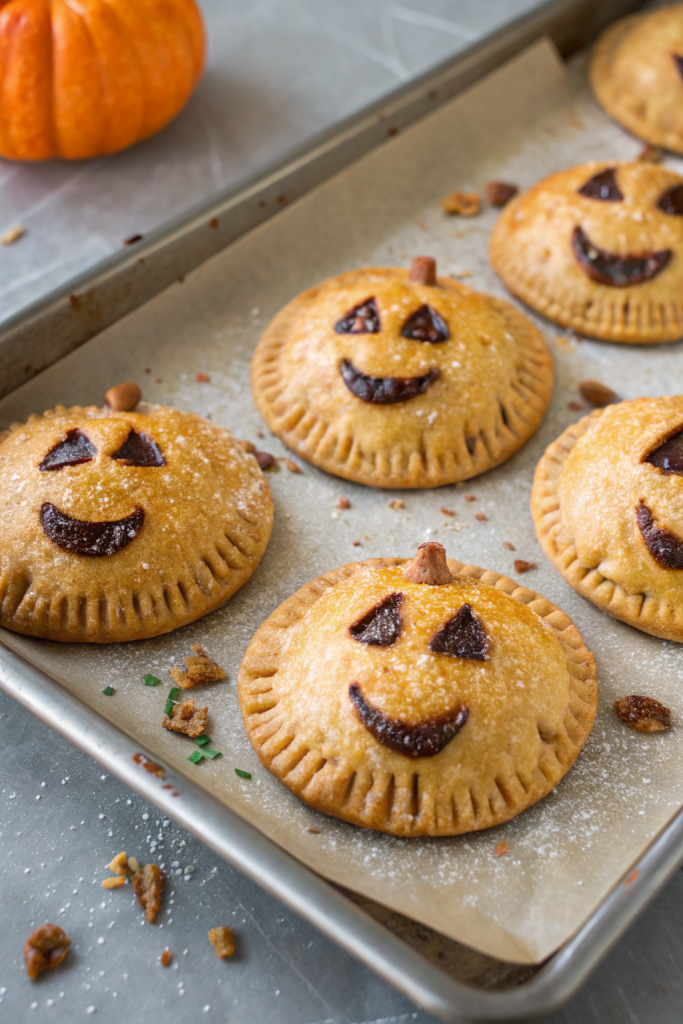
Step 7: Add Pumpkin Details
Use a small sharp knife to cut 3 to 4 shallow curved lines from top to bottom on each pie to mimic pumpkin ridges. Do not cut all the way through; just score the surface. Cut a tiny slit near the top as a steam vent.
If you want a more defined stem, pinch the top center gently with your fingers.
Step 8: Egg Wash and Sugar Topping
Brush the tops of the mini pies lightly with more egg wash. Sprinkle coarse sugar over each pie for crunch and shine. Add a light dusting of cinnamon if you like extra spice.
Make sure no egg wash pools around the base, since that can glue the pies to the parchment.
Step 9: Bake
Place the baking sheet in the preheated 375°F oven. Bake for 18 to 22 minutes, until the pies look golden brown and you see tiny bubbles of filling at some vents. Rotate the pan halfway through baking for even color.
If your oven runs hot, start checking at 16 minutes so the edges do not overbrown.
Step 10: Cool and Serve
Remove the baking sheet from the oven and place it on a cooling rack. Let the pumpkin shaped mini apple pies cool on the pan for at least 10 to 15 minutes. The filling thickens as it cools and stays inside the crust instead of running out.
Serve warm or at room temperature. Add a scoop of vanilla ice cream or a spoonful of whipped cream if you feel extra cozy.
What to Serve with it?
Pumpkin shaped mini apple pies taste amazing with a scoop of vanilla ice cream, cinnamon ice cream, or a dollop of whipped cream. You can also pair them with a mug of hot apple cider, chai tea, or hot chocolate for a full fall dessert moment. Kids enjoy them with cold milk, while adults often reach for hot coffee or a latte.
These mini pies also sit nicely on a dessert board with caramel dip, sliced apples, and a few chocolate pieces.
Storage Options
- Store leftover pumpkin shaped mini apple pies in an airtight container at room temperature for up to 1 day.
- For longer storage, keep them in the fridge in a sealed container for up to 4 days.
- To freeze, place cooled pies on a baking sheet, freeze until solid, then transfer to a freezer bag and keep up to 2 months.
- Reheat from room temperature or fridge in a 325°F oven for 8 to 10 minutes until warm and crisp again.
- Reheat from frozen in a 325°F oven for about 15 to 18 minutes, or until the centers feel hot and the crust turns crisp.

Pumpkin Shaped Mini Apple Pies
Ingredients
Method
- Peel, core, and finely dice the apples into small cubes about pea to corn kernel size. Place them in a small bowl and add the granulated sugar, brown sugar, flour, cinnamon, nutmeg, allspice (if using), lemon juice, and vanilla. Stir until the apples are evenly coated and no dry flour pockets remain, then set aside.
- Line a baking sheet with parchment paper or a silicone baking mat. In a small bowl, whisk the egg with the milk or cream to make an egg wash. Preheat the oven to 375°F (190°C).
- Lightly flour your work surface and rolling pin. Unroll one pie crust or roll chilled homemade dough to about 1/8 inch thick. Use a pumpkin-shaped cookie cutter (about 3 to 3.5 inches wide) to cut as many pumpkins as possible. Gather the scraps, reroll, and cut more shapes. Repeat with the second crust, making sure you have an even number of pumpkin cutouts.
- Place half of the pumpkin cutouts on the prepared baking sheet to use as bottoms. Reserve the remaining pumpkin shapes on the counter for the tops. If the dough softens, chill the pan briefly to firm it up.
- Spoon a small mound of apple filling into the center of each pumpkin bottom, leaving about a 1/4-inch border around the edges so you can seal the pies. Avoid overfilling to prevent leaks.
- Brush the exposed edges of each bottom pumpkin lightly with egg wash. Place a pumpkin top over each one, lining up the edges, and gently press around the filling to push out excess air. Use a fork to crimp all around the edges and seal the mini pies.
- With a small sharp knife, score 3 to 4 shallow curved lines from top to bottom on each pie to mimic pumpkin ridges, taking care not to cut all the way through. Cut a tiny slit near the top of each pie as a steam vent.
- Brush the tops of the mini pies with more egg wash. Sprinkle each pie with coarse or turbinado sugar and, if desired, a light dusting of ground cinnamon. Avoid letting egg wash pool at the base of the pies.
- Bake at 375°F (190°C) for 18 to 22 minutes, rotating the baking sheet halfway through, until the pies are golden brown and tiny bubbles of filling appear at the vents. Begin checking around 16 minutes if your oven runs hot.
- Place the baking sheet on a cooling rack and let the mini pies cool on the pan for at least 10 to 15 minutes so the filling can thicken. Serve warm or at room temperature, optionally with vanilla ice cream or whipped cream.
Notes
Approximate per mini pie (based on about 10 pies, using standard refrigerated pie crust): 190–220 calories; fat 10–12 g; saturated fat 3–4 g; carbohydrates 26–30 g; fiber 1–2 g; sugars 11–15 g; protein 2–3 g; sodium 160–220 mg. Values will vary based on crust brand, exact pie size, and any add-ins. Storage: Store at room temperature up to 1 day or refrigerated in an airtight container up to 4 days. Freeze baked and cooled pies up to 2 months; reheat in a 325°F oven until warm and crisp.