
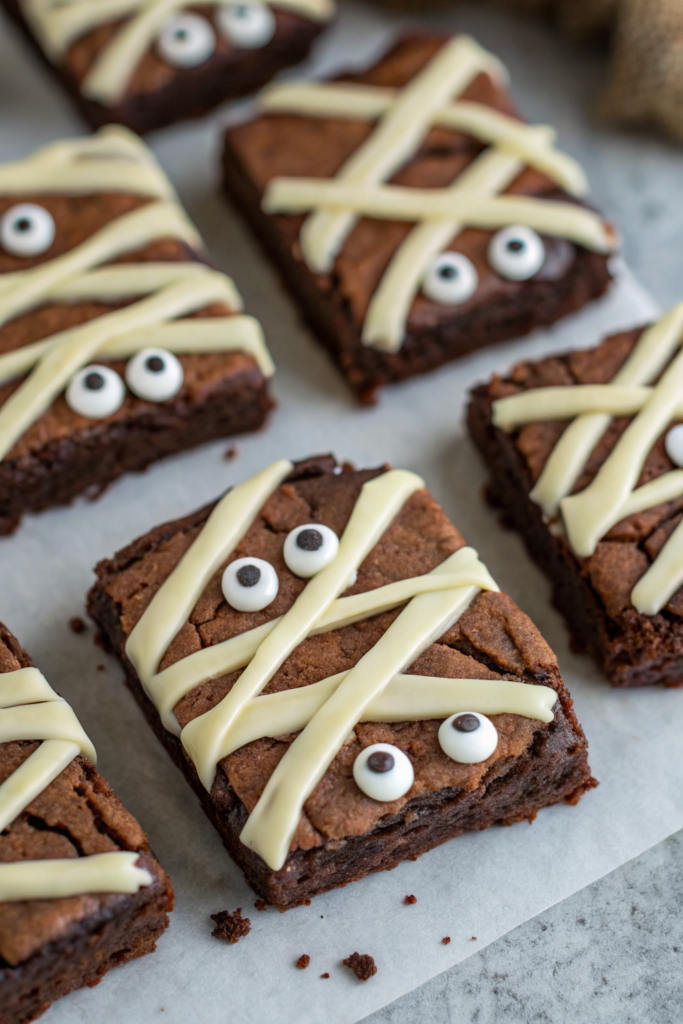
Spooky Mummy Brownies Recipe hits that perfect mix of fudgy chocolate, creamy vanilla frosting, and just enough Halloween creepiness to make kids squeal and adults pretend they are not excited. This recipe works for busy parents, party hosts, and chocolate lovers who want a fun dessert on the table in about 45 minutes. I first made these for a neighborhood Halloween potluck, and my tray came home with nothing but crumbs and one stray candy eye.
Why Make This Spooky Mummy Brownies Recipe at Home
Homemade spooky mummy brownies taste richer, fudgier, and more chocolatey than store bought treats. You control the ingredients, the level of sweetness, and how spooky or silly those little mummy faces look.
You also save money when you bake a full pan instead of buying individual themed treats. Kids can help pipe the mummy bandages and press on the candy eyes, which turns dessert into a fun activity instead of just another sugar rush.
“These spooky mummy brownies disappeared faster than any Halloween dessert I have ever served, and everyone begged for the recipe. ★★★★★”
Ingredients You Need
You can use a boxed brownie mix or a from scratch brownie base. I will list both options so you can pick what fits your time and energy level.
Brownie base (from scratch)
- 1 cup (2 sticks) unsalted butter, melted and slightly cooled
- 1 1/2 cups granulated sugar
- 1/2 cup packed light brown sugar
- 4 large eggs, room temperature
- 2 teaspoons pure vanilla extract (I like Nielsen-Massey or Costco vanilla)
- 1 cup all purpose flour
- 1 cup unsweetened cocoa powder (use Dutch process for deeper flavor, natural cocoa works too)
- 1/2 teaspoon fine sea salt
- 1/2 teaspoon baking powder
- 1 cup semisweet chocolate chips or chunks (optional but highly recommended)
Brownie base (boxed shortcut)
- 1 box brownie mix (18 to 19 ounce size, any brand you like)
- Ingredients listed on the box (usually eggs, oil, and water)
- Optional: 1/2 cup chocolate chips to boost the chocolate flavor
You can follow the box directions for baking time and temperature. I still line the pan with parchment and slightly underbake for fudgy texture.
Mummy decoration
- 1 1/2 to 2 cups white chocolate chips or white candy melts
- Candy melts set a bit firmer and work great for neat mummy bandages.
- White chocolate tastes better but can melt a little softer.
- 1 to 2 teaspoons neutral oil (vegetable or canola) to thin the melted white chocolate if needed
- Candy eyeballs (Wilton or any grocery store baking aisle brand)
- Optional: black gel icing to draw tiny mouths or eyebrows
Equipment
- 9×13 inch baking pan
- Parchment paper
- Mixing bowls
- Whisk and rubber spatula
- Hand mixer or stand mixer (optional, you can mix by hand)
- Small microwave safe bowl for melting white chocolate
- Piping bag or zip top bag with a small corner snipped off
- Toothpick or small offset spatula
Tips & Mistakes
- Line the pan with parchment so you lift the whole slab of brownies out cleanly for easy cutting.
- Slightly underbake the brownies so the center stays fudgy; dry brownies make sad mummies.
- Let brownies cool completely before decorating so the white chocolate does not slide off.
- Melt white chocolate in short bursts in the microwave and stir often so it does not scorch.
- Add a tiny bit of oil if the melted white chocolate looks too thick; add it slowly so it does not turn runny.
- Use a zip top bag if you do not own piping bags; snip a tiny corner so you get thin mummy bandages.
- Press candy eyes on while the white chocolate still feels soft so they stick well.
- Cut brownies into even rectangles before decorating so each piece has its own mummy face.
- Keep the knife clean between cuts so the edges stay neat and do not crumble.
- Store decorated brownies in a single layer or with parchment between layers so the bandages stay pretty.
How to Make Spooky Mummy Brownies Recipe
Step 1: Prep the pan and oven
- Preheat your oven to 350°F.
- Line a 9×13 inch pan with parchment paper and leave a little overhang on the long sides so you can lift the brownies out later.
- Lightly grease the parchment with a thin layer of butter or nonstick spray.
Step 2: Mix the brownie batter from scratch
-
In a large bowl, whisk the melted butter, granulated sugar, and brown sugar until the mixture looks glossy and thick.
-
Add the eggs one at a time and whisk after each addition until the batter looks smooth and slightly lighter in color.
-
Stir in the vanilla extract.
-
In a separate bowl, whisk the flour, cocoa powder, salt, and baking powder.
-
Add the dry ingredients to the wet ingredients and fold gently with a spatula until no dry streaks remain.
-
Fold in the chocolate chips if you use them, and avoid overmixing so the brownies stay tender.
Step 3: Mix the brownie batter from a box (shortcut)
- Add the brownie mix and the box ingredients to a bowl.
- Stir until the batter looks smooth and thick, then fold in chocolate chips if you want extra richness.
- Do not overmix; stop once everything looks combined.
Step 4: Bake the brownies
-
Pour the batter into the prepared pan and spread it into an even layer.
-
Bake for 22 to 28 minutes for fudgy brownies, or follow the box time if you use a mix.
-
Check with a toothpick in the center; you want moist crumbs but not wet batter.
-
Remove the pan from the oven and place it on a cooling rack.
-
Let the brownies cool completely in the pan, which usually takes about 1 hour.
-
Lift the cooled brownie slab out by the parchment and place it on a cutting board.
Step 5: Cut the brownies into mummy shapes
- Use a sharp knife to trim the edges if you want perfectly neat sides.
- Cut the brownies into rectangles or squares; I like pieces about 1 1/2 by 3 inches so they look tall and mummy like.
- Wipe the knife between cuts so crumbs do not drag across the top.
Step 6: Melt the white chocolate
- Place white chocolate chips or candy melts in a microwave safe bowl.
- Microwave in 20 to 30 second bursts, stirring well after each burst, until the mixture looks smooth and fully melted.
- If the mixture looks too thick to pipe, stir in 1 teaspoon of neutral oil and check the texture before adding more.
Step 7: Pipe the mummy bandages
-
Transfer the melted white chocolate to a piping bag or a zip top bag.
-
Snip a very small tip off the bag so you get thin lines.
-
Pipe zigzag lines across each brownie, leaving a small gap where you plan to place the eyes.
-
Crisscross some lines diagonally so the bandages look wrapped and messy.
-
Work in batches so the chocolate does not set in the bowl; you can rewarm it for a few seconds if needed.
-
Do not worry about perfection; crooked bandages give each spooky mummy brownie its own personality.
Step 8: Add the candy eyes and details
-
While the white chocolate still feels soft, gently press two candy eyes into each brownie.
-
Adjust them so they sit close together or slightly uneven for a spooky or goofy look.
-
If you want extra detail, use black gel icing to draw tiny mouths, eyebrows, or little frowns.
-
Let the decorated brownies sit at room temperature until the white chocolate sets and firms up.
-
Once set, transfer them to a serving platter or airtight container.
-
Serve and enjoy your spooky mummy brownies recipe with proud Halloween baker energy.
Variations I've Tried
I sometimes swirl a few tablespoons of peanut butter into the brownie batter before baking, which gives the mummies a secret nutty layer. You can also stir in chopped Oreos or Halloween sprinkles for extra crunch and color. If you want a darker look, use dark chocolate brownies and leave a little more space between the white bandages so the contrast pops.
You can swap the white chocolate bandages for vanilla frosting in a piping bag if you prefer a softer, sweeter topping. I also like to use mini brownies baked in a mini muffin pan and decorate them as tiny round mummies, which work great for kids who want smaller treats. If you avoid dairy, use a dairy free brownie recipe and dairy free white chips so everyone at the party can enjoy a spooky mummy brownie.
How to Serve Spooky Mummy Brownies Recipe
Serve spooky mummy brownies at room temperature so the texture stays fudgy and the white chocolate bandages do not feel too hard. Add them to a Halloween dessert board with sliced apples, caramel dip, popcorn, and chocolate covered pretzels. Kids love to pick their favorite mummy face, so mix silly, surprised, and spooky expressions.
You can also pack these brownies in lunch boxes or bring them to school parties, since they travel well once the chocolate sets. If you want a fun dessert plate, pair a spooky mummy brownie with a scoop of vanilla or chocolate ice cream and a drizzle of chocolate sauce.
How to store
- Store spooky mummy brownies in an airtight container at room temperature for 2 to 3 days.
- If your kitchen runs warm, keep them in the fridge for up to 5 days; let them sit at room temperature for 15 minutes before serving so the texture softens.
- To freeze, place undecorated brownie squares on a baking sheet, freeze until firm, then wrap each piece in plastic and store in a freezer bag for up to 2 months.
- Freeze decorated brownies on a tray until firm, then layer them in a container with parchment between layers; use within 1 month for best texture.
- Reheat individual brownies in the microwave for 5 to 10 seconds if you want a warm center, and add the candy eyes after reheating if they look delicate.