
Easy Sweet tart Crust Recipe tastes like a buttery sugar cookie that hugs your filling and stays crisp, not soggy. It works perfectly for beginners or busy bakers and takes about 1 hour total, including chilling and baking. I tested this on a Tuesday night after a long workday, and my kids still asked for seconds, so I knew it passed the real-life test.
Why Make This Easy Sweet tart Crust Recipe at Home
Homemade sweet tart crust tastes fresher and more tender than store-bought shells. You control the sweetness, thickness, and ingredients, which helps if you avoid certain additives or just want real butter flavor.
You also press or roll it right into your own tart pan, so it fits perfectly and does not shrink into a sad little disk. This recipe uses simple pantry ingredients and a food processor or mixer, so you skip fancy techniques and still get bakery-level results.
"This Easy Sweet tart Crust Recipe tastes like a buttery shortbread cookie that holds any filling like a champ, and it bakes up perfectly crisp every time. ★★★★★"
Ingredients You Need
Dry ingredients
- 1 1/4 cups (150 g) all-purpose flour
- Use a standard unbleached all-purpose flour like King Arthur or Gold Medal.
- Avoid cake flour, which makes the crust too fragile.
- 1/3 cup (40 g) powdered sugar
- Powdered sugar gives a tender, melt-in-your-mouth texture.
- Use store-brand powdered sugar without strong vanilla flavor.
- 1/8 teaspoon fine sea salt
- Fine salt mixes more evenly than coarse salt.
Fat and flavor
- 1/2 cup (113 g) unsalted butter, cold and cut into small cubes
- Use real butter, not margarine, for the best flavor.
- I like a European-style butter like Kerrygold when I feel fancy, but any good unsalted butter works.
- 1 large egg yolk, cold
- Egg yolk adds richness and helps the dough hold together.
- 1 teaspoon pure vanilla extract
- Use pure vanilla, not imitation, since the crust carries a lot of flavor.
Liquid
- 1 to 2 teaspoons cold heavy cream or cold milk, only if needed
- This helps bring the dough together if it looks too dry.
- Use milk if you do not keep cream in the fridge.
Pantry shortcuts and substitutions
- Use salted butter if that is what you have, and reduce the added salt to a tiny pinch.
- Swap almond extract for half the vanilla if you want a subtle almond note.
- Replace up to 1/4 cup of the all-purpose flour with almond flour for a slightly nutty, tender crust.
Equipment list
- 9-inch tart pan with removable bottom
- Mixing bowls or a food processor
- Pastry cutter or fork if you mix by hand
- Measuring cups and spoons or a kitchen scale
- Rubber spatula
- Rolling pin or flat-bottomed measuring cup for pressing
- Fork for docking the crust
- Parchment paper and pie weights, dry beans, or rice for blind baking
- Cooling rack
Tips & Mistakes
- Chill the dough at least 30 minutes so it holds its shape and does not slump in the oven.
- Use cold butter and cold egg yolk so the crust bakes flaky and tender, not tough.
- Do not overwork the dough, or gluten develops and the crust turns chewy instead of crisp.
- Press the dough evenly into the pan so you avoid thick corners and burnt edges.
- Dock the bottom of the crust with a fork so steam escapes and the crust does not puff up.
- Use pie weights or dry beans during blind baking so the sides stay tall and neat.
- Keep an eye on the edges during baking and cover them with foil if they brown too fast.
- Let the crust cool completely before you add custard or cream fillings so they do not melt or separate.
How to Make Easy Sweet tart Crust Recipe
Step 1: Mix the dry ingredients
Add the flour, powdered sugar, and salt to a bowl or food processor. Whisk or pulse a few times until the mixture looks uniform. This step spreads the sugar and salt evenly so you do not get random sweet or salty spots.
Step 2: Cut in the cold butter
Add the cold butter cubes to the dry ingredients. Use a pastry cutter, fork, or food processor pulses until the mixture looks like coarse crumbs with pea-sized bits of butter. Those little butter bits melt in the oven and give the crust a tender, shortbread-like texture.
Step 3: Add egg yolk and vanilla
Stir the egg yolk and vanilla together in a small bowl. Pour the mixture over the flour and butter mixture. Mix with a fork or pulse in the processor until the dough starts to clump.
If the dough looks dry and sandy and does not hold when you squeeze it, sprinkle in 1 teaspoon of cold cream or milk. Mix again and add up to 1 more teaspoon only if you need it. The dough should hold together when pressed but not feel sticky.
Step 4: Bring the dough together
Turn the dough out onto a clean surface. Gently press it together with your hands into a disk. You do not need to knead it; just press until it forms a smooth disk with no dry crumbs.
Wrap the dough disk in plastic wrap or place it in a reusable container. Chill it in the fridge for at least 30 minutes and up to 2 days. This rest time relaxes the gluten and firms the butter, which helps the crust bake evenly.
Step 5: Shape the crust in the tart pan
Lightly flour your work surface and rolling pin. Roll the chilled dough into a circle about 11 inches wide and about 1/8 inch thick. Rotate the dough and dust lightly with flour as you roll so it does not stick.
Gently roll the dough around the rolling pin and unroll it over the tart pan. Lift the edges and ease the dough into the corners without stretching it. Press the dough firmly along the bottom and up the sides so it makes good contact with the pan.
Trim the excess dough by rolling the pin across the top edge of the pan or by cutting with a small knife. Patch any thin spots or cracks with extra dough. Prick the bottom all over with a fork.
If the dough softened while you worked, place the pan in the fridge for 15 minutes. This quick chill helps the crust hold its shape in the oven.
Step 6: Blind bake the crust
Preheat your oven to 375°F (190°C). Place the tart pan on a baking sheet for easier handling. Line the crust with parchment paper and fill it with pie weights, dry beans, or rice.
Bake the crust for 15 minutes. Remove the pan from the oven and carefully lift out the parchment and weights. The edges should look set, and the bottom should look slightly dry.
Step 7: Finish baking
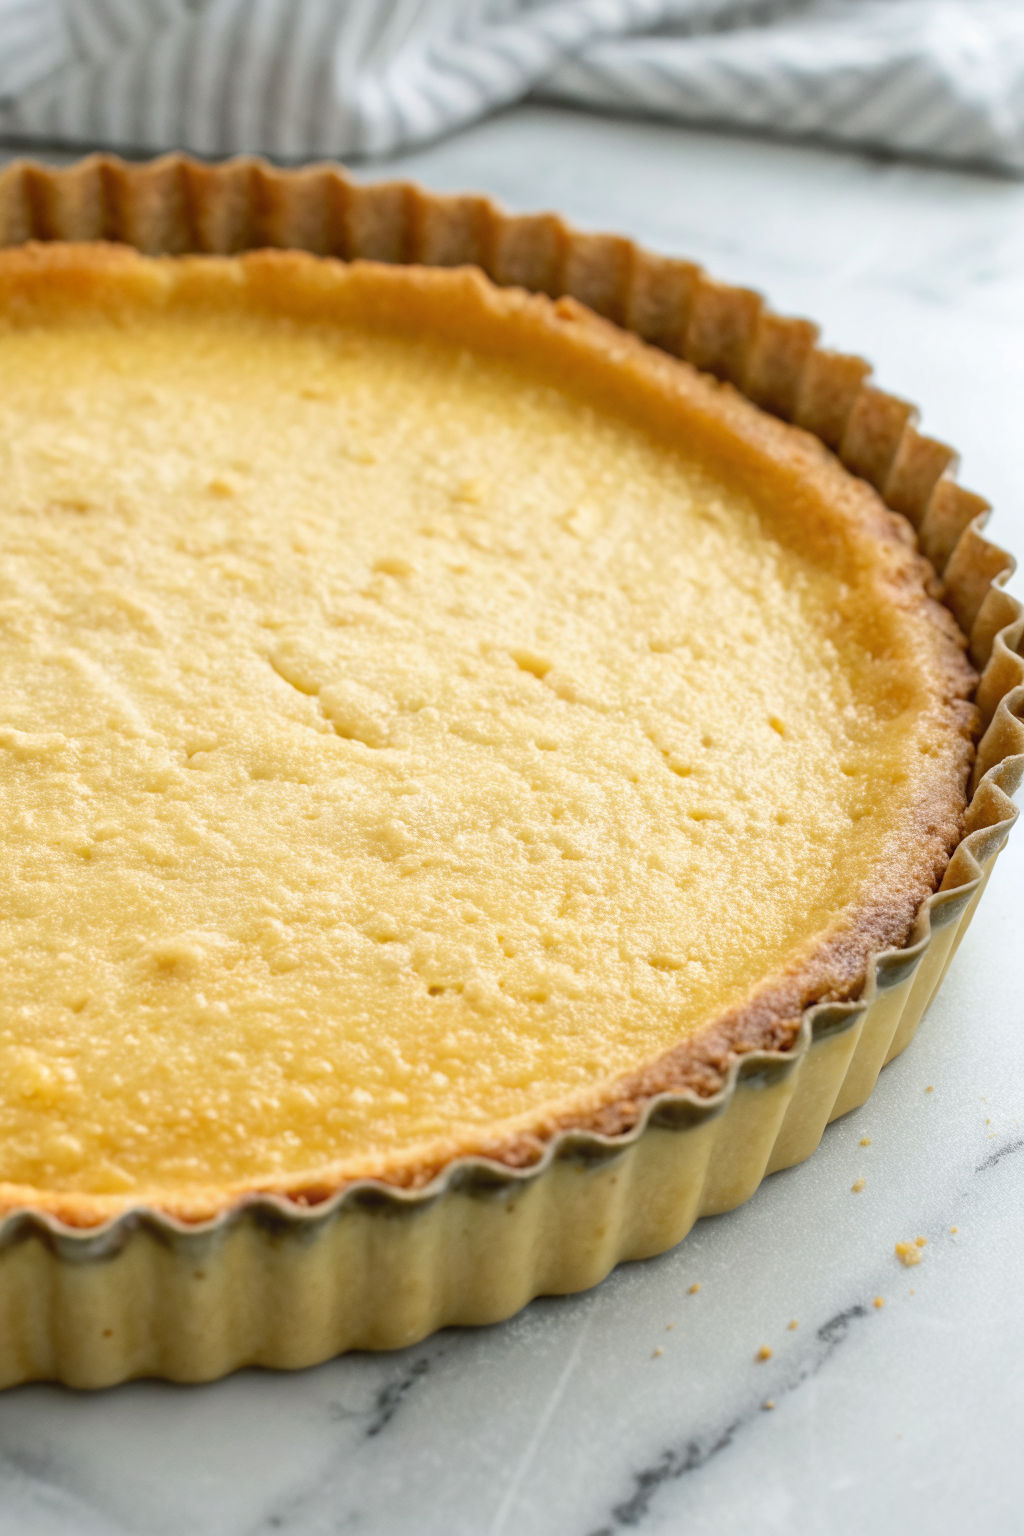
Return the crust to the oven with no weights. Bake 10 to 15 more minutes until the bottom looks dry and lightly golden and the edges look a deeper golden color. If the edges brown too fast, cover them loosely with strips of foil.
If you plan to bake a filling inside the crust, underbake it slightly and pull it when it looks pale golden. If you plan to fill it with a no-bake filling like pastry cream or chocolate ganache, bake until fully golden and crisp. Place the pan on a cooling rack and let the crust cool completely before you add filling.
Variations I've Tried
I swap 1/4 cup of the flour with almond flour for a nutty, tender crust that pairs beautifully with berries and stone fruit. I also add 1 teaspoon of finely grated lemon or orange zest to the dough when I want a bright citrus note. A cocoa version works well too: replace 3 tablespoons of flour with unsweetened cocoa powder and add 1 extra tablespoon of powdered sugar.
For a warm, cozy flavor, I stir in 1/4 teaspoon of cinnamon and a tiny pinch of nutmeg. I also tried a brown sugar twist by replacing half the powdered sugar with light brown sugar, which gave a slightly chewier, caramel-like crust that tasted great with apple or pear fillings. If you bake gluten free, you can use a 1:1 gluten free flour blend and add 1 extra teaspoon of cream to help the dough come together.
How to Serve Easy Sweet tart Crust Recipe
This sweet tart crust works as a base for almost any filling, from silky lemon curd to fresh berries with pastry cream. Fill it with chocolate ganache and top it with sliced strawberries for a simple but fancy-looking dessert. You can also spoon in vanilla pudding, top with sliced bananas, and finish with whipped cream for a quick banana cream tart.
Serve slices with hot coffee, tea, hot chocolate, or a cold glass of milk. Kids love it with simple fresh fruit and a drizzle of chocolate or caramel sauce. Adults usually appreciate that it tastes like a cookie and a tart shell had a very delicious baby.
How to store
- Store the baked, unfilled crust at room temperature, wrapped well, for up to 2 days.
- Keep a filled tart in the fridge, covered, for 2 to 3 days, depending on the filling.
- Freeze the unbaked dough disk for up to 2 months; thaw it overnight in the fridge before rolling.
- Freeze a fully baked, unfilled crust in the pan, wrapped tightly, for up to 1 month; thaw at room temperature.
- Reheat a baked crust in a 325°F (165°C) oven for 5 to 8 minutes to refresh the crisp texture before you add filling.
Easy Sweet Tart Crust Recipe
Ingredients
Method
- In a medium bowl, whisk together the flour, powdered sugar, and salt.
- Cut in the cold butter using a pastry cutter or your fingertips until the mixture resembles coarse crumbs with some pea-sized pieces of butter remaining.
- In a small bowl, whisk the egg yolk with vanilla (if using). Drizzle over the flour mixture and gently toss with a fork. Add ice water 1 tablespoon at a time only if needed, just until the dough starts to clump together when pressed.
- Turn the dough onto a lightly floured surface and gently bring it together into a disk without overworking. Wrap in plastic wrap and chill for at least 30 minutes.
- Preheat the oven to 375°F (190°C). On a lightly floured surface, roll the chilled dough into a circle about 1/8-inch thick, large enough to fit a 9-inch tart pan.
- Transfer the dough to the tart pan, gently pressing it into the bottom and up the sides. Trim excess dough and prick the base all over with a fork.
- Line the crust with parchment paper and fill with pie weights or dried beans. Bake for 15 minutes, then carefully remove the parchment and weights.
- Return the crust to the oven and bake for another 8–10 minutes, or until lightly golden and cooked through. Let cool completely before filling.
Notes
Approximate per 1 slice (1/8 of crust only): 230 calories; fat 14 g; saturated fat 8 g; carbohydrates 22 g; fiber 1 g; sugars 7 g; protein 3 g; sodium 90 mg. Values will vary based on brands, add-ins, and portion size.