Yaki Onigiri Japanese Grilled Rice Balls Recipe tastes crispy, smoky, a little salty, and deeply comforting, like the best part of the rice at the bottom of the pot. This recipe works great for busy home cooks who want a fast snack or side dish in about 35 minutes from start to finish. I ate an embarrassing number of these while testing, strictly in the name of research, of course.
Why Make This Yaki Onigiri Japanese Grilled Rice Balls Recipe at Home
Homemade yaki onigiri tastes fresher, holds its shape better, and costs way less than anything from a store or restaurant. You control the seasoning, the fillings, and how crispy you like the crust.
You also avoid mystery sauces and can keep everything vegetarian or seafood based. Kids love these, adults snack on them straight from the pan, and they travel well in lunch boxes.
“Perfectly crispy outside, soft and steamy inside, this Yaki Onigiri Japanese Grilled Rice Balls Recipe became my new favorite snack in one bite. ★★★★★”
Ingredients You Need
Rice
- 2 cups uncooked Japanese short grain rice
- Use sushi rice or any Japanese short grain variety.
- Avoid long grain rice, jasmine, or basmati, because they do not stick together well.
- 2 1/4 cups water for cooking the rice
- 1/2 teaspoon fine sea salt
Sauce / Glaze
You can keep it classic with soy and mirin, or use pantry shortcuts.
- 2 tablespoons soy sauce
- Use regular or light soy; low sodium works if you prefer less salt.
- 1 tablespoon mirin
- If you do not have mirin, use 1 tablespoon water plus 1/2 teaspoon sugar.
- 1 teaspoon sugar
- 1 teaspoon toasted sesame oil
- Optional: 1 teaspoon rice vinegar for a tiny tang
Optional Fillings
Pick one or mix and match. Keep pieces small so the rice balls hold together.
- 1–2 tablespoons cooked salmon, flaked
- 1–2 tablespoons canned tuna mixed with a little mayo and soy
- 1 tablespoon umeboshi (pickled plum), pitted and chopped
- 1 tablespoon furikake rice seasoning
- 1 tablespoon finely chopped scallions
- 1 tablespoon finely chopped pickled vegetables
Toppings and Extras
- 1–2 sheets nori, cut into strips or rectangles
- Toasted sesame seeds
- Extra furikake
- Shichimi togarashi (Japanese chili seasoning), to taste
Oil
- 1–2 tablespoons neutral oil with a high smoke point
- Use canola, avocado, grapeseed, or vegetable oil.
- Avoid olive oil, since it can burn and add a strong flavor.
Equipment
- Rice cooker or medium saucepan with lid
- Large bowl for handling and shaping rice
- Small bowl of water and a pinch of salt for your hands
- Nonstick skillet or well seasoned cast iron pan
- Silicone brush or spoon for the glaze
- Spatula
Tips & Mistakes
- Rinse the rice until the water runs almost clear, so the grains cook fluffy and not gummy.
- Let the rice cool until warm but not hot, so you shape it without burning your hands and still keep it sticky.
- Wet and lightly salt your hands before shaping, so the rice does not stick and the outside gets a light seasoning.
- Shape the onigiri firmly, or they fall apart in the pan; press with confidence, not fear.
- Keep the rice balls medium size; huge ones stay cold inside while the outside crisps.
- Preheat the pan and use medium heat, so the crust browns slowly and does not scorch.
- Brush on the glaze near the end of cooking, or the sugar in the sauce burns.
- Flip gently with a spatula and support the side with your fingers if needed, so the triangle edges stay sharp.
- Do not drown the rice balls in sauce; a light glaze tastes better and keeps the crust crisp.
- If you add fillings, keep them in the center and avoid very wet fillings, or the onigiri split.
How to Make Yaki Onigiri Japanese Grilled Rice Balls Recipe
Cook the Rice
- Rinse the rice under cold water, swishing with your hand, and drain. Repeat until the water looks mostly clear.
- Add the rice and measured water to a rice cooker or saucepan.
- Cook the rice according to your rice cooker instructions, or bring the pot to a boil, cover, lower the heat, and simmer for about 12–15 minutes until the water absorbs.
- Turn off the heat and let the rice sit covered for 10 minutes so the steam finishes the cooking.
- Fluff the rice gently with a rice paddle or spatula.
Cool and Season the Rice
- Transfer the hot rice to a large bowl.
- Sprinkle in the 1/2 teaspoon salt and toss gently.
- Let the rice cool until it feels warm but comfortable to touch.
- Cover the bowl with a clean towel so the rice does not dry out while you shape it.
Shape the Onigiri
- Set a small bowl of water next to you and add a pinch of salt.
- Wet your hands lightly, then rub your palms together with the salted water.
- Take a handful of warm rice, about 1/3 to 1/2 cup, and press it together into a loose ball.
- If you use a filling, flatten the rice in your hand, add about 1 teaspoon of filling in the center, then fold the rice around it and seal it.
- Shape the rice into a triangle by cupping your hands: press the top corner with one hand and the bottom corners with the other, turning the rice a little each time.
- Press firmly enough so the rice holds together, but not so hard that you crush every grain.
- Place each finished onigiri on a plate or tray.
- Repeat until you use all the rice.
Mix the Glaze
- In a small bowl, stir together soy sauce, mirin, sugar, sesame oil, and rice vinegar if you use it.
- Taste the sauce and adjust with a pinch more sugar or soy if you like.
- Set the glaze near the stove with a brush or spoon.
Grill the Rice Balls in a Pan
- Heat a nonstick or cast iron skillet over medium heat.
- Add enough neutral oil to lightly coat the bottom of the pan.
- When the oil shimmers, place the rice balls in the pan, leaving space between them.
- Cook the first side for 3–4 minutes until it turns golden and feels firm and crisp when you tap it with chopsticks or a spatula.
- Flip and cook the second side for another 3–4 minutes.
- Turn the rice balls to cook the edges for 1–2 minutes, so every surface gets some color.
Add the Glaze
- Lower the heat slightly so the sauce does not burn.
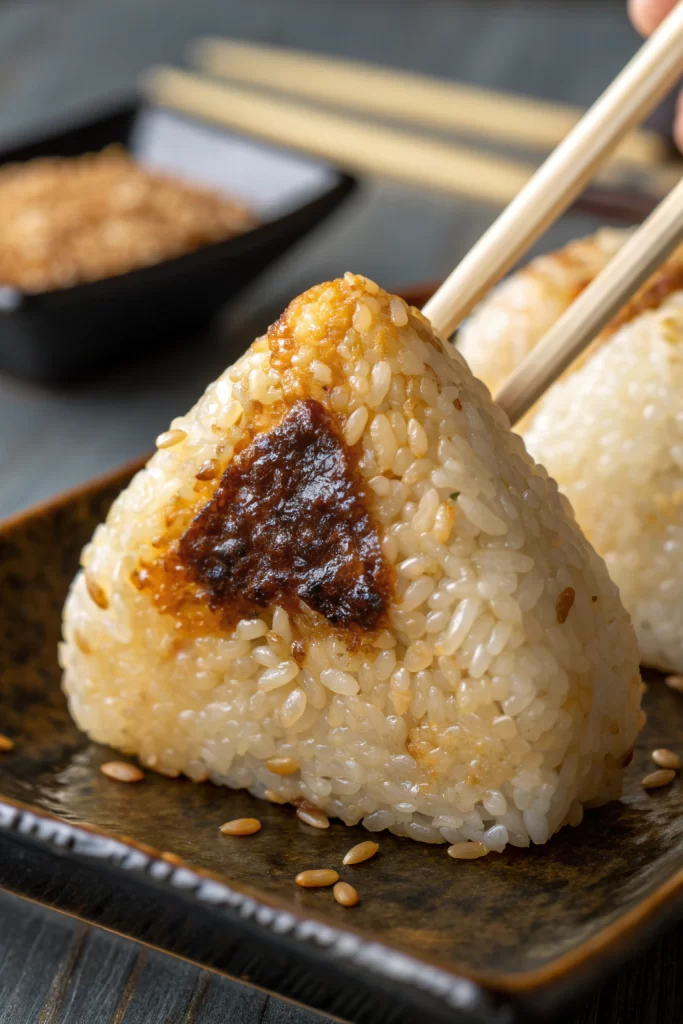
- Brush a thin layer of glaze on the top of each rice ball.
- Flip after about 30–45 seconds, then brush the other side.
- Continue to flip and brush lightly until each side looks shiny and caramelized, about 1–2 more minutes total.
- Move the finished yaki onigiri to a plate or rack so the bottoms do not steam and soften.
Finish and Serve
- While the rice balls still feel hot, sprinkle on toasted sesame seeds, furikake, or shichimi togarashi.
- Add a strip or rectangle of nori to the bottom or side of each onigiri if you like a seaweed grip.
- Serve right away while the outside stays crisp and the inside stays warm and fluffy.
Variations I’ve Tried
- Miso glaze: Mix 1 tablespoon white or red miso with 1 tablespoon mirin and 1 teaspoon sugar, then thin with a splash of water. Brush this on instead of the soy glaze for a deeper savory flavor.
- Cheesy yaki onigiri: Tuck a small cube of mozzarella or mild cheese in the center as a filling. The cheese melts inside and turns the rice ball into a gooey snack.
- Garlic butter soy: Melt 1 tablespoon butter, add 1 small grated garlic clove and 1 tablespoon soy sauce. Brush this on near the end of cooking for a rich, almost steakhouse style flavor.
- Furikake rice mix: Mix furikake directly into the rice before shaping, then glaze with plain soy sauce. This method seasons every bite and works great for lunch boxes.
- Spicy version: Add a little chili crisp or shichimi togarashi into the glaze or sprinkle it on top after cooking. The gentle heat pairs nicely with the smoky crust.
How to Serve Yaki Onigiri Japanese Grilled Rice Balls Recipe
Serve yaki onigiri hot as a snack, side dish, or light meal with a bowl of miso soup and some sliced cucumbers. Pack them in lunch boxes with edamame, carrot sticks, and a little soy sauce on the side. You can also serve them alongside grilled chicken, tofu, or salmon with a simple green salad. Kids enjoy them plain, while adults often reach for extra furikake or chili seasoning.
How to store
- Room temperature: Keep yaki onigiri at room temperature for up to 4 hours, covered with a clean towel or beeswax wrap so they do not dry out.
- Fridge: Store cooled rice balls in an airtight container for up to 2 days; line the container with a paper towel to catch extra moisture.
- Freezer: Wrap each rice ball tightly in plastic wrap, then place them in a freezer bag and freeze for up to 1 month.
- Reheating: Reheat from the fridge or freezer in a covered skillet with a tiny bit of oil over low to medium heat until hot and crisp again, or use an air fryer at 350°F for 5–8 minutes, turning once.

Yaki Onigiri Japanese Grilled Rice Balls Recipe
Ingredients
Method
- In a small bowl, mix together the soy sauce, mirin, sugar, and sesame oil (if using) until the sugar is dissolved. Set aside.
- Season the warm cooked rice with the sea salt and gently fold to distribute evenly, taking care not to mash the grains.
- With damp, clean hands, divide the rice into 8 equal portions. Shape each portion into a firm triangle or round rice ball, pressing gently but firmly so it holds together.
- Preheat a lightly oiled nonstick skillet or grill pan over medium heat.
- Place the rice balls in the pan and cook for 3–4 minutes per side, or until the surface is dry and lightly crisped. Turn carefully with a spatula or tongs.
- Brush the tops of the rice balls lightly with the soy sauce mixture, flip, and brush the other side. Continue grilling 1–2 minutes per side, turning as needed, until the exterior is deeply golden and fragrant.
- Remove from the pan, sprinkle with toasted sesame seeds, and wrap with nori strips if desired. Serve hot or warm.
Notes
Approximate per serving (2 rice balls): 210 calories; fat 4 g; saturated fat 0.5 g; carbohydrates 40 g; fiber 1 g; sugars 3 g; protein 5 g; sodium 520 mg. Values will vary based on brands, add-ins, and portion size.